Unity Modding
We are going to create a mod called MyMod. It will have a single prefab which will get packed into an addressable bundle. Along with the catalog json files required for the mod to load.
Prerequisites
You will need Unity installed and the BAS SDK downloaded. You can follow the Unity and SDK Setup Guide to do so.
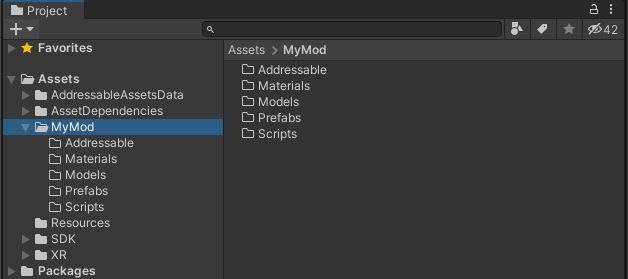
Creating our mod folder structure
It is a good idea to create a folder for your mod to keep all the things it needs together.
In the Unity editor Project tab, create a folder under Assets called MyMod, along with other folders like Prefabs, Models, Materials, Addressable to help you organise your mod.
Create Asset Bundle Group
Our mod MyMod needs an Asset Bundle Group.
This is what tells our mod builder which asset bundles should be packaged together for our mod.
Lets create one for our mod.
- Right Click our
Assets/MyMod/Addressablefolder we created previously. - Go to ThunderRoad
- Go to Editor
- Click
Asset Bundles Group - Name it
MyModGroup - Click on
MyModGroup - Go to the
Inspectortab in the Unity editor. - In the
Folder NametypeMyMod. - Click the + icon under
Addressable Asset Groupsto add a new entry.
Make sure you don’t name your Asset Bundles Group the same thing as your mod folder, as this will conflict with our Addressable Asset Group in later steps. Appending “group” to the name is good practice, like MyModGroup.
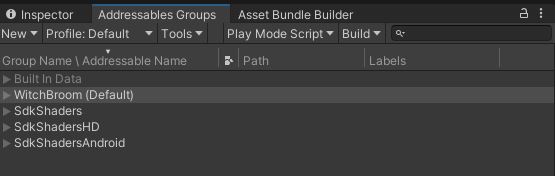
We have now created an Asset Bundle Group called MyModGroup.
This tells the mod builder what our mod folder is called and which Addressable Asset Groups will be included in it.
Addressable Asset Group
The Addressable Asset Group is what will hold references to our assets so they can be loaded into game.
You can split your mod up into multiple groups in order to separate maps, weapons and their materials and effects for example. So if you only change a weapon, you only need to rebuild the weapons group rather than a single large one which contains multiple weapons and maps.
Opening the Addressables Group tab
The Addressables Group window lets us add new Addressable groups, setup labels and edit the addressable addresses for our assets.
The Addressables Group window can be opened by going to:
Window menu > Asset Management > Addressables then clicking Groups
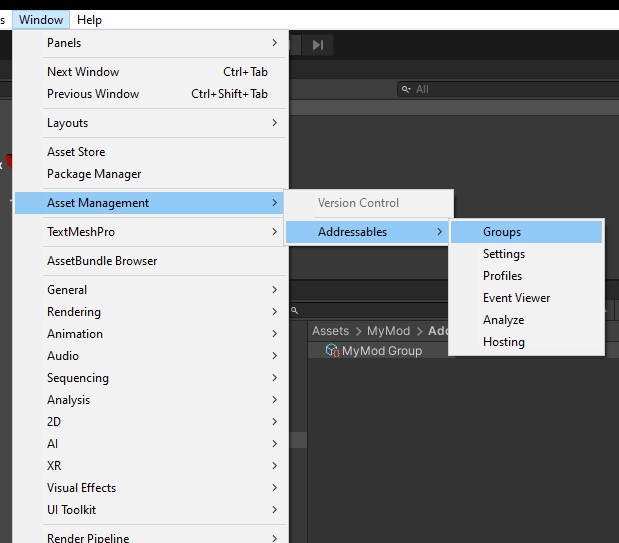
It will open a window on your Unity editor.
If you have lots of greyed out groups, you can right click the greyed out group and click “Clear Missing References”
Creating an Addressable Asset Group
We will create a new Addressable Asset Group and move it into our mods folder structure so we can easily move it to new projects later if needed. This just helps to keep everything about the mod together.
With the Addressable Group window open:
- Click the
Newdrop down button. - Click
Packed Assets - Right Click the newly created
Packed Assetsgroup in theAddressable Groupwindow. - Click
Rename - Name the group
MyMod
You can name the Addressable Group anything, like MyMod-Weapon1, MyModAssets, Map1, Map2 etc. They get bundled under our mod folder MyMod using the Asset Bundle Group in a later step.
We have now created our Addressable Group for our mod, MyMod.
Organizing Addressable files
We will now move the Addressable files into your mod folder so we can easily back them up, commit them to git, or export them if needed.
- Your project view should have changed to
Assets/AddressableAssetsData/AssetGroupsand yourMyModgroup should be highlighted.- If not navigate to that folder and click your new
MyModgroup.
- If not navigate to that folder and click your new
- Drag your
MyModgroup into yourAssets/MyMod/Addressablefolder - In the project view navigate to
Assets/AddressableAssetsData/AssetGroups/Schemas - Drag your
MyMod_BundledAssetGroupSchemaschema into yourAssets/MyMod/Addressablefolder - Drag your
MyMod_ContentUpdateGroupSchemaschema into yourAssets/MyMod/Addressablefolder
You should now have 4 files inside your Assets/MyMod/Addressable folder.
- MyModGroup - Asset Bundle Group
- MyMod - Addressable Asset Group
- MyMod_BundledAssetGroupSchema - Bundle Asset Group Schema
- MyMod_ContentUpdateGroupSchema - Content Update Group Schema
Adding Addressable Asset Groups to Asset Bundle Group
We need to now add our newly created Addressable Asset Group to our Asset Bundle Group. This is where if we have multiple Addressable Groups, we would add them here under the modsAsset Bundle Group. But in our example we only have one.
- Navigate to your
Assets/MyMod/Addressablesfolder - Click the
Asset Bundle GroupcalledMyModGroup - In the
Inspectorwindow, you should see yourAsset Bundle Group. We already added an empty space for ourAddressable Asset Groupin previous steps, but if you haven't click the + icon. - Drag and drop our
MyModaddressable group into theElement 0box.
We now have everything joined up with our addressable system.
We can start to add assets into the addressable group MyMod so we can export them.
Adding assets to the Addressable group
An asset needs to be made addressable and added to an Addressable Asset Group so it can be exported.
Create a prefab
Lets create a simple cube prefab. Normally you would be creating a weapon or something.
- Right click in the Unity Hierarchy view and click
3D Object>Cube - Drag the newly created
CubeGameObject into ourAssets/MyMod/Prefabsfolder - Click on the
Cubeprefab in thePrefabsfolder
Setting the Default Addressable Asset Group
The prefab needs to be made addressable in our Addressable Asset Group and be given a unique address to be accessed in game.
- Open the
Addressable Groupswindow - Right click our
MyModgroup - Click
Set as Default
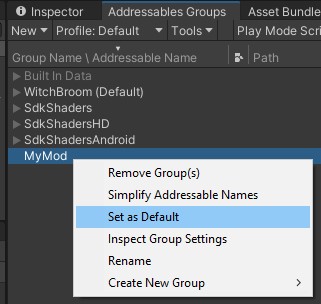
This will add any new addressable objects to our group by default.
Making our prefab addressable
Now we can make the prefab addressable.
- Navigate to
Assets/MyMod/Prefabs - Click the
Cubeprefab. - In the
Inspectorwindow click theAddressablecheckbox - In the box that appears type a unique address for your prefab, like
MyMod.Prefabs.Cube - Press enter so it saves the address.
- In the
Addressables Groupswindow, expand theMyModgroup - In the Labels column, click the empty drop down box.
- Select
Windowsif its for a PCVR mod,Androidfor Nomad, or select both if the mod will be exported for both games.
Well done, you have added your asset to the bundle!
It's nearly ready to be exported! We just need to setup our Catalog files.
Setup Catalogs
The catalog is how we tell B&S how to load our mods. They are json files which define items, spells, mods, level modules and various effects.
For this mod, we just need a manifest.json file to define our mod so B&S will load it.
To create the catalog for our mod, we must go to the BasSDK-master\BuildStaging\Catalogs folder. This is not accessible from the Project view within Unity. So you need to do it in Windows.
To get their quickly, Right click the Assets folder in the Unity Project view and click Show In Explorer. Then you can go into BuildStaging\Catalogs.
Inside the \BuildStaging\Catalogs folder, create a folder with the same name as our MyModGroup asset bundle has, in this case, a folder called MyMod.
Creating the mod manifest.json
The manifest defines your mod name, description, version and which GameVersion it is for. The GameVersion changes with updates and needs to match the version the game expects, like 0.11.0.0.
Create a file called manifest.json in BasSDK-master\BuildStaging\Catalogs\MyMod with the following contents:
{
    "Name": "MyMod",
    "Description": "This is my cool mod",
    "Author": "Wully",
    "ModVersion": "1.0.0",
    "GameVersion": "0.11.0.0"
}
If you have having trouble creating it you can download this example here. U11 Manifest file (You might need to right click and click Save link as to download it)
If we had any other json files like a Level.json or Item.json files, we could also put them in this BasSDK-master\BuildStaging\Catalogs\MyMod folder.

Exporting the mod
So we now have our Catalog with our json files in place, and our addressable groups with our addressable assets setup.
We can now export our mod!
We will be using the Asset Bundle Builder to export our mod to the PCVR Steam directory.
Asset Bundle Builder
The Asset Bundle Builder is used to build our mod, we can export individual Asset Bundle Groups containing our addressables, or multiple that may go into the same mod folder.
It will build our mod, and export it, along with our Catalog json files in the BuildStaging\Catalogs\MyMod folder.
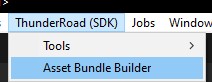
Opening the Asset Bundle Builder
The Asset Bundle Builder can be opened by going to the ThunderRoad (SDK) menu, then clicking Asset Bundle Builder.
It will open a window on your Unity editor.
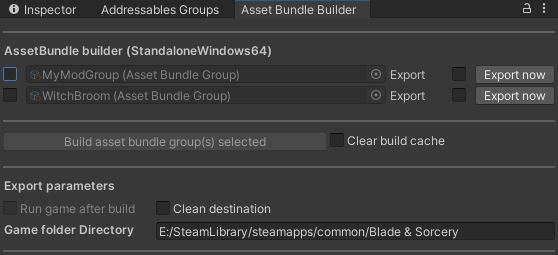
Build the Bundle Group
To build the bundle click the check box on the left side of the bundle name.
Then click Build asset bundle group(s) selected
This will build our assets, but not export them yet.
The first time building may take a long time due to the shaders being compiled. Subsequent builds should be quicker.
Exporting the Bundle Group
Now that we have done a build for the first time it should be quicker in the future.
We can export our mod by also clicking the export checkbox on the right side of the bundle group name.
Finally, click Build asset bundle group(s) selected to rebuild the mod and export it in one go.
Once it has built, it will copy the Catalog json files and the addressable bundles into your Mod folder.
Clicking “Export now” will export the assets only, it does package the catalog into a MyMod.jsondb file but it currently goes into the wrong directory. It is not recommended to use the “Export Now” button
Testing the mod!
Our mod doesn't add anything like a weapon to the game, but we should be able to see that it loaded by launching the game and checking the logs. Refer to the Guides section on how to access the logs.
On PCVR you can also press F8 to open the console and see the log.
Log file example
This is an extract of the log file where the mod successfully loads.
We can see that our assets (the content catalogs) successfully loads.
We can see when it loads the json that our mod is picked up and it loads the Catalog.
[DLL] - Loading mod plugins
[DLL] - Loaded mod plugins
------------> DLL loaded in 0.01 sec
------------> Addressable locations Initializing
------------> Addressables locations Intialized in 0.00 sec
Load content catalogs...
Successfully loaded content catalog at path E:/SteamLibrary/steamapps/common/Blade & Sorcery/BladeAndSorcery_Data/StreamingAssets\Default\catalog_bas.json
Successfully loaded content catalog at path E:/SteamLibrary/steamapps/common/Blade & Sorcery/BladeAndSorcery_Data/StreamingAssets\Mods\MyMod\catalog_MyMod.json
Successfully loaded all content catalog
------------> Content catalog loaded in 1.00 sec
[JSON] - Loading all JSON
[JSON] - Loading game catalog
[JSON][bas] - Loading catalog game by WarpFrog
[JSON][bas] - Loading file: Default/bas.jsondb
[JSON][bas] - Loaded file: Default/bas.jsondb
[JSON][bas] - Loaded catalog game by WarpFrog
[JSON] - Loaded game catalog
[JSON] - Loading mod catalog
[JSON][MyMod] - Loading catalog MyMod by Wully
[JSON][MyMod] - Loaded catalog MyMod by Wully
[JSON] - Loaded mod catalog
[JSON] - Finished loading all JSON
------------> Json loaded in 0.95 sec